Airtable Integration - Send Parsed Emails to Airtable November 2022 · ian
How To Send Your Parsed Emails to Airtable
One of the key reasons that businesses start parsing emails is to use that email data on third party platforms. They will use their parsed email data and connect it with some other site that will allow them to do something with it. In some cases that might be analyzing it on a spreadsheet, others may be some sort of automation that takes out the manual work. There are tons of examples, but they all work the same way. The first step is to send your parsed email data to the third party platform via a webhook. Once the third party receives the webhook, it will ingest that data and do something with it. We will be running through many examples that show how to send your parsed email data to different third party platforms. This specific post will be showcasing how to send our emails to Airtable, which if you’re unfamiliar with, is a web based spreadsheet product. It’s quickly turning in to something more than that, but for the sake of simplicity it is essentially google sheets on steroids. We will be taking our email data and every time a new email comes in, it will get parsed, a webhook will be sent to Airtable and the email data will be automatically inserted in to a new row.
Setting Up Email Parsing
The first part of sending your email data requires us to have some parsed email data to send, so let’s walk through how to setup email parsing.
We’ll assume you’ve already signed up for HostedHooks and created your free account (if not you can do that here). Once that is complete you want to head to your HookHelpers. There you’ll create a new HookHelper, which will act as your inbox for the emails that you want to parse.

On your new HookHelper, grab the custom email address (see above) and go ahead and send yourself a test email. This email should be similar to what you want to eventually parse as you’ll need to make parsing rules that match. For the sake of this demo, we are going to do a very lightweight parsing example, but the same process would be used for your implementation.
Once you’ve sent your test email, give a minute for it to be received and ingested by the HostedHooks platform. Then go ahead and refresh and you should see a new request in the sidebar, it should be your ingested email.

Now that we have a request, we need to setup our parsing rules. Go ahead and click on “Parsing” in the nav bar.

This next page is where you will be building the structure of the data that you want to convert your emails into. For every parsed email you want some output of data to send to Airtable. We will build that data structure through these rulesets. The output of each ruleset is a key, value pair, where the key is the label of the rule and the value is the extracted value from your email, based on the parsing rules you setup.
So for example we want to create a payload that looks like the below.

Let’s walk through how to do that by showing how to set up the firstname key value pair. Start by creating a new ruleset. The label of the ruleset is going to be the key of the key value pair that we end up creating, so in our case we want the label to be “firstname”. Next we will keep the body selected for the content type since the data that we are looking to extract is found in the body of the email. You can ignore the sample email for now. Hit save and let’s move on to building the parsing rules.
We start with the raw text at the top and we ultimately want to end up with just the first name data point extracted. To accomplish this we first create a 'Capture all after the match' rule, which will take the input, in our case 'First Name'. The parsing engine will find the first occurrence of ‘First Name’ and parse out all text following that match, just like the rule says.
That gives you the following output.

Now we want to create a rule that will capture all the data before the 'Last Name' value. We do this by creating a 'Capture all before the match' rule and using the keyword 'Last Name:' as the input. With this rule, the parsing engine will locate the first instance of 'Last Name:' and parse all the text before that match.
That gives you the following output.
In some cases, we will have some extra whitespace or new line characters surrounding our final output. To solve for this we have a 'Remove leading and trailing whitespace' rule which will remove all of that for you. You may want to add that as precautionary rule, but that is up to you.
In our case here our final output looks good and we are capturing the dynamic data that we intended for at the beginning. Our ruleset is good to go for the 'First Name' value.

For the sake of simplicity, we aren’t going to run through every ruleset in this article, but essentially you would repeat the same process above for every data point that you are looking to extract. If you have any questions about how to parse some content, come join us in our Discord and we’ll be happy to help.
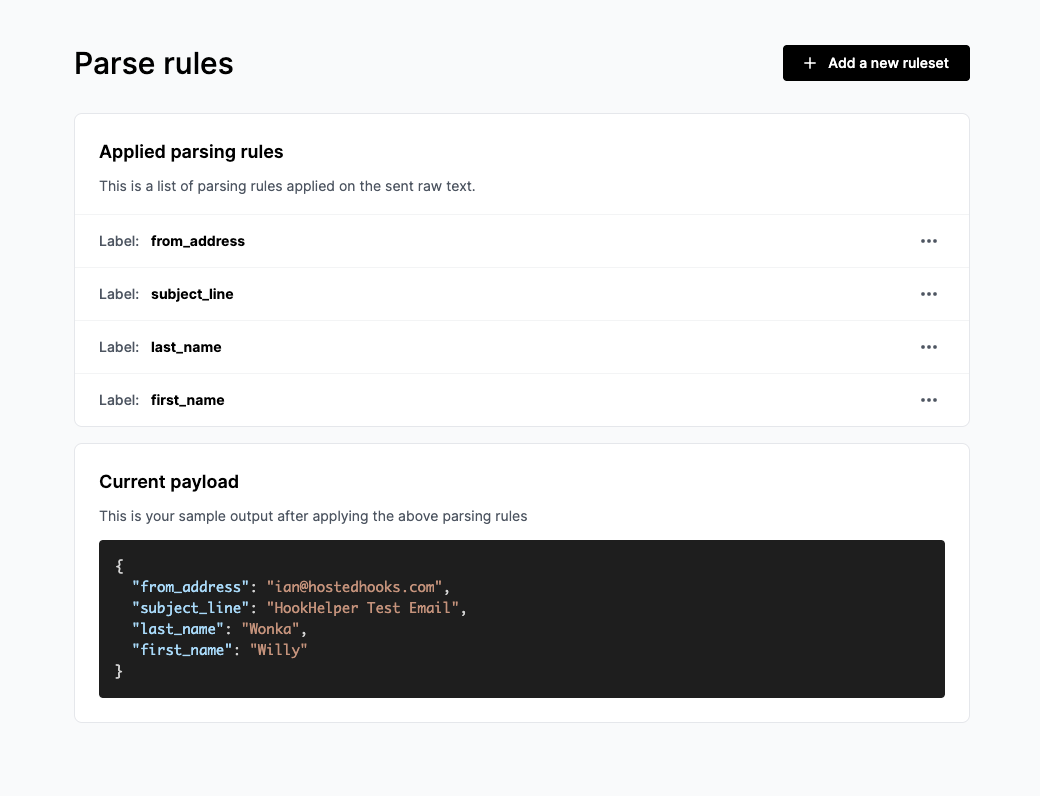
Now that you are done building your rulesets you will see your final sample output on the rulesets index page (see below). The "current payload" is the structure that each new parsed email will get turned into. Obviously, the data will change as it gets dynamically added based on the contents of the email.
Now that we have our parsing payload completed, we can move on to setting up the Webhook and Airtable integration.
Sending your emails to Airtable
Let’s quickly regroup, in the previous section we:
- Sent an email to a custom email inbox on HostedHooks
- Reviewed that ingested email
- Setup parsing rules to turn that email data into a data payload of key value pairs
Next we want to setup sending our payload to Airtable, which we are going to do using webhooks. Start by clicking on ‘Webhooks’ in the navbar. This page will act as the home for all of your webhooks. You can set up as many as you’d like so in theory you can send the same parsed email to multiple places.
Go ahead and click ‘Setup a new webhook’.
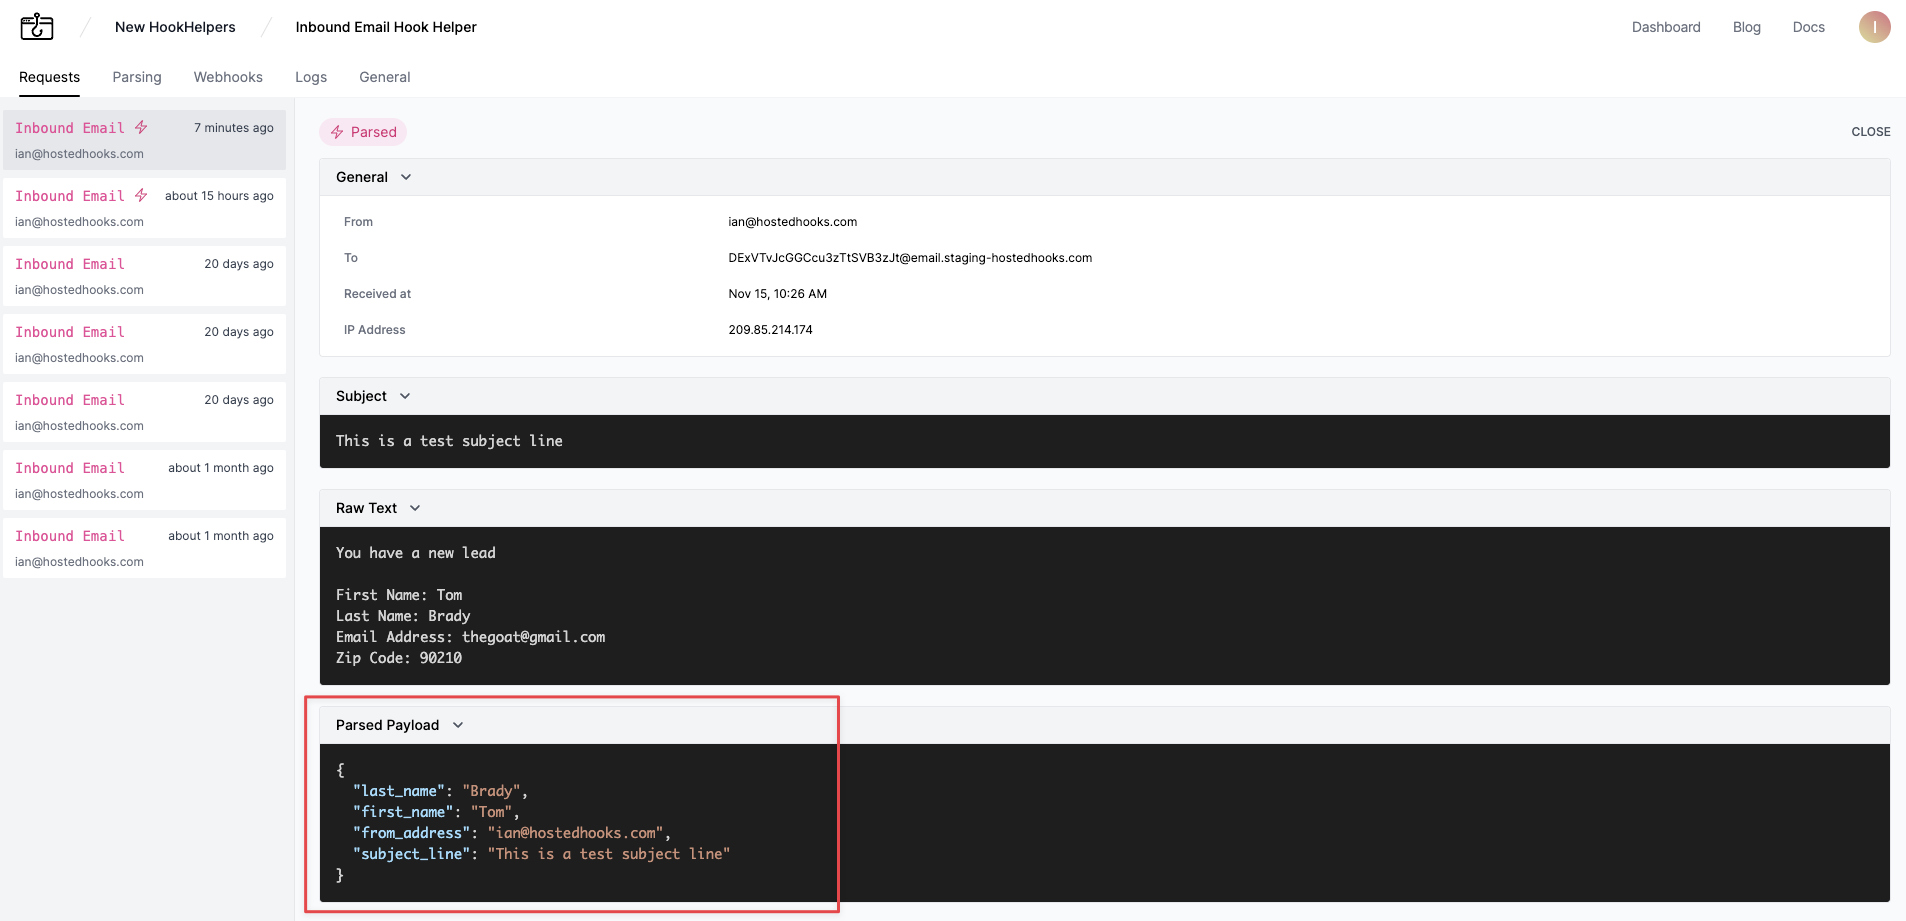
At the top you should see the payload you generated in the parsing steps above. It should look something like this.

That is going to be the payload that we are going to send to Airtable using a webhook. To setup that webhook scroll down to Step 1. Here we need to add a label and the Airtable endpoint URL.
Side note: HostedHooks has two ways of setting up endpoints, there is a quick way and a more advanced way. They both do the same thing, just the advanced option gives users more flexibility. For the sake of simplicity, we will be showing you the Quick Setup. Feel free to follow our blog for a future article that walks you through the advanced route.
For Step 1, we will need to provide a label for this endpoint, let’s call it ‘Airtable Integration’ and we’ll need to add the Airtable endpoint URL of where we want to send this data. For this we will need to head over to Airtable and setup an Automation.
If you don’t already have an Airtable account, you will need to set one up for these next few steps.
To start, go ahead and create a new base or pick a base that you want to add your email data to. To start we will want to update the sheet to support the data that we are sending over via a webhook. In our example it is 4 values of single line text: First name, Last name, Subject Line and From Address, so I went ahead and updated those columns with the correct labels and data types. Next we want to head over to Automations to setup the webhook.

On the Automations page we are going to want to setup a trigger that inserts a record into airtable whenever a webhook is received. To do this click “Add Trigger” and click “When webhook received” in the dropdown.

This will pop open a sidebar with a bunch of configuration details. The first step is to copy the webhook URL on the sidebar, head back to HostedHooks and paste it in to the Endpoint URL form on Step 1 and hit save endpoint.

Once that is saved we will want to hop to Step 2 on the HostedHooks side and send a test message. This is going to make a test call and send over our payload to Airtable, which is great because it confirms that everything is setup properly on the HostedHooks side and will also send over test data to Airtable to help us finish our integration. Go ahead and do that and give it a few minutes to do it’s thing. Once it’s been a minute or so, click logs in the navbar of your webhook and that should bring up a page that shows a log of the successful test webhook.

Once that’s been confirmed on the HostedHook’s side, head back over to Airtable and you should see an update there in the sidebar.

This is showing that the test webhook that we sent over from the HostedHooks side was delivered and ingested correctly. It even parsed our payload in to the correct key/value pairs. Now that we have some data, we will want to finish our automation to map that data to some actions. Go ahead and click “Add action” and then click “Create Record”. On the side bar go down to the configuration, choose the table that we had setup the columns for and now we’ll start mapping our webhook data to the correct fields.
Once you have mapped everything correctly, it should look something like this.

Go ahead and generate a preview and it should show all of the data correctly mapped.

Now we just now need to turn it on and run some tests. Find the On/Off toggle on the top left and turn on your automation. Next head back to HostedHooks and activate your webhook in step 3. You are all set! Moving forward any new emails that come in will get parsed and sent directly to Airtable.
We are going to send a test email to our custom email address and with everything activated make sure the email gets ingested propery, parsed and then sent to Airtable to be automatically added to the sheet.
We are going to send the following email

Give it a few minutes and go check your requests, you should see one there.
Now give it a minute or so to parse and send over to Airtable. If all goes well you should see new data in your Airtable Shhet.
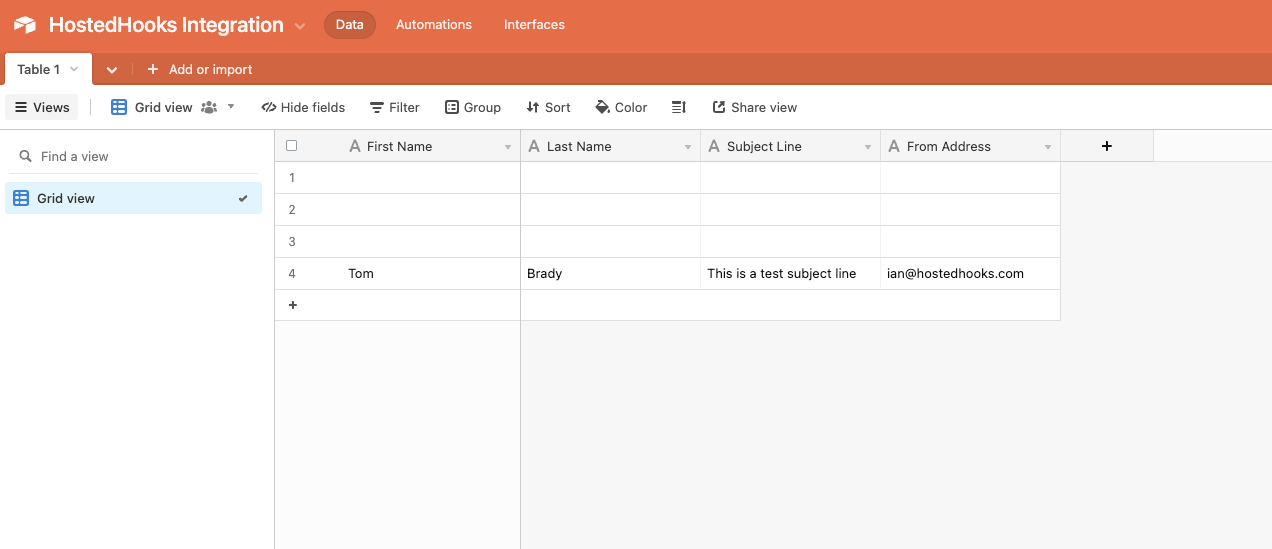
That's it, we've successfully turned an email into airtable data.
Conclusion
Just to recap we have shown you how to ingest emails in to HostedHooks, parse those emails into JSON and then send that JSON to other services, like Airtable, using webhooks. Also we did it with absolutely no code which is extremely powerful. We hope this was useful and if you have any questions you can find us on our discord.
Try HostedHooks Free
Getting started is easy! No credit card required.

Ian

Ian

Ian