Build Webhooks using Javascript and Node.js (Sample App) April 2022 · ian
Introduction
We've gotten a handful of requests from javascript developers on how to integrate HostedHooks webhooks into their Node.js web applications. So we decided to put together a walkthrough and sample application to show how easy it is.
If you are a Javascript developer that uses Node, then this article is for you. Today we are going to walk through what it takes to add webhooks to an ecommerce application that manages order states (think an overly simplified Shopify app). The app will emulate the backend state management for orders which will trigger webhook events ( via HostedHooks ) whenever the state changes on an order in the example app. The app is fully open sourced (see the resources below) so you can clone the code and run it locally alongside this demo.
We hope you enjoy it and let us know if you have any questions or feedback!
Getting Started
Resources
Here are some additional resources that you may need before we get started:
To integrate the Node.js demo app with the HostedHooks webhook service you will need to start by creating a HostedHooks account. It will only take a few minutes and then we can get started on the fun part.
Step 1: Create an account
Go to www.hostedhooks.com/sign_up to create an account and fill in your organization info.
Step 2: Generate an app for your webhooks
Next, you need to create a new app, this app is where your webhooks will be sent from, just click on "Setup new app" in your dashboard and enter the app name.
For more info, check out our documentation.
Step 3. Create a Webhook Event for your app instance
After creating your app, it's the time to prepare our app to recieve webhooks, let's create a Webhook Event that subscribers can subscribe to.
In our online store demo app, we created an order.created event, that triggers whenever a new order is created.

More info on how to create webhook events can be found here
Here are some additional events that you may want to create for an ecommerce order tracking application:
order.fulfilled - triggered whenever an order is fulfilled.
order.shipped - triggered whenever an order is shipped.
order.canceled - triggered whenever an order is canceled.
order.returned - triggered whenever an order is returned.
We recommend you follow a convention when naming your events, something like namespace.event would work.
Note: The event name being sent from your application must match the event name of the webhook event created in your app instance and the webhook events must be created first.
Nodejs 'Expressjs' app
Now that we are all set with our setup, let's move onto the code, you can clone our ready-to-go app and follow along with us.
First we will set our environemnt variables.
Copy the .env.example file in root directory to .env (which will be ignored by Git):
$ cp .env.example .env
Then set each variable on .env :
HOSTEDHOOKSAPIKEY must be the API Key from your account settings.
APP_UUID must be the ID of your HostedHooks app instance.
Your .env file should look like this:
HOSTEDHOOKS_API_KEY=...
APP_UUID=...
Running the app
# install dependencies
$ npm install

# start your app
$ npm start
Your app is now running at http://localhost:3000
Setting up the app:
In this app, we route all requests to the /api path:
// app.js
const express = require('express');

// load environment variables
require('dotenv').config();

const orderRoutes = require('./routes/order');

const app = express();

// App global middleware
app.use(express.json());

// Routing your http requests
app.use('/api', orderRoutes);
Here we create two POST request handlers, one for creating an order, and the other for receiving events of a specific order from something like a shipping service:
// routes/order.js
const router = require('express').Router();

const {
    createOrder,
    createEvent
} = require('../controllers/order');

// POST request handler for creating an order
router.post('/order', createOrder);

// This is where your events are processed for a confirmed order
router.post('/orders/:order_id/event', createEvent);

module.exports = router;
Triggering an event:
After processing your POST request and creating the order, you can send a webhook message by calling the sendWebhookMessage function which is a wrapper around the HostedHooks API.
// controllers/order.js
const createOrder = (req, res, next) => {
    const {
        user_id,
        product_id,
        price,
        amount,
        tax,
        total
    } = req.body.order;

    // you may want to store it in a database, and generate the ID automatically
    const data = {
        order_id: 'a1b2c3d4e5f6g7h8i9', // demo ID
        user_id,
        product_id,
        price,
        amount,
        tax,
        total,
    };

    // you can pass in whatever data you want to send with the event
    sendWebhookMessage('order.created', data)
        .then((result) => {
            res.status(201).json({
                message: 'Order has been created successfully',
                result
            });
        })
        .catch((error) => {
            res.status(error.status).json({
                message: error.message
            });
        });
};
The data object is what you want to send to your webhook subscribers, you can customize it however you want.
Building your webhook message:
const fetch = require('node-fetch');

const sendWebhookMessage = (event, data) => {
    var url = new URL(
        `https://www.hostedhooks.com/api/v1/apps/${process.env.APP_UUID}/messages`
    );

    // webhook message
    var messagePayload = JSON.stringify({
        data: {
            order: data, // order data
    },
    version: '1.0',
    event_type: event, // ex: 'order.created'
});

var requestOptions = {
    method: 'POST',
    headers: {
        Authorization: `Bearer ${process.env.HOSTEDHOOKS_API_KEY}`,
        'Content-Type': 'application/json',
    },
    body: messagePayload,
    redirect: 'follow',
};

fetch(url, requestOptions)
    .then((result) => result.text())
    .catch((error) =>
        throw error);
};
The payload of the webhook message is very simple:
data: It is your custom payload and the information that will be passed on to your webhook subscribers
version: This is the version of the payload that you want to send. You can build different versions of your payloads without breaking your existing subscriber's integrations.
event_type: This is the webhook event that was triggered. It is the attribute that we use to route your webhook to the correct subscribers
Add Subscribers
Lastly, before we test the full flow, we will need to setup a subscriber to receive the webhook message. In our example this would be the store or an application that needs to receive order data via webhooks.
We've covered how to setup a subscriber in another article which is linked here here. Please follow along there and come back here once ready.
Testing the app
Now your app is ready to go, copy and paste this curl into your terminal to create an order which will kick off the webhook message.
curl -X POST http://localhost:3000/api/order \
     -H "Content-type: application/json" \
     -d '{ "order": {
              "user_id": "123456789",
              "product_id": "a1b2c3d4e5f6g7h8i9",
              "price": "20.99",
              "amount": "2",
              "tax": "3.8",
              "total": "45.78"
            }
         }'
You should get a 201 Created success status response code which indicates that your webhook message has been sent, and your subscribers were notified.

If you hop back to your HostedHooks dashboard, you will also see that the message that we sent has been recieved.
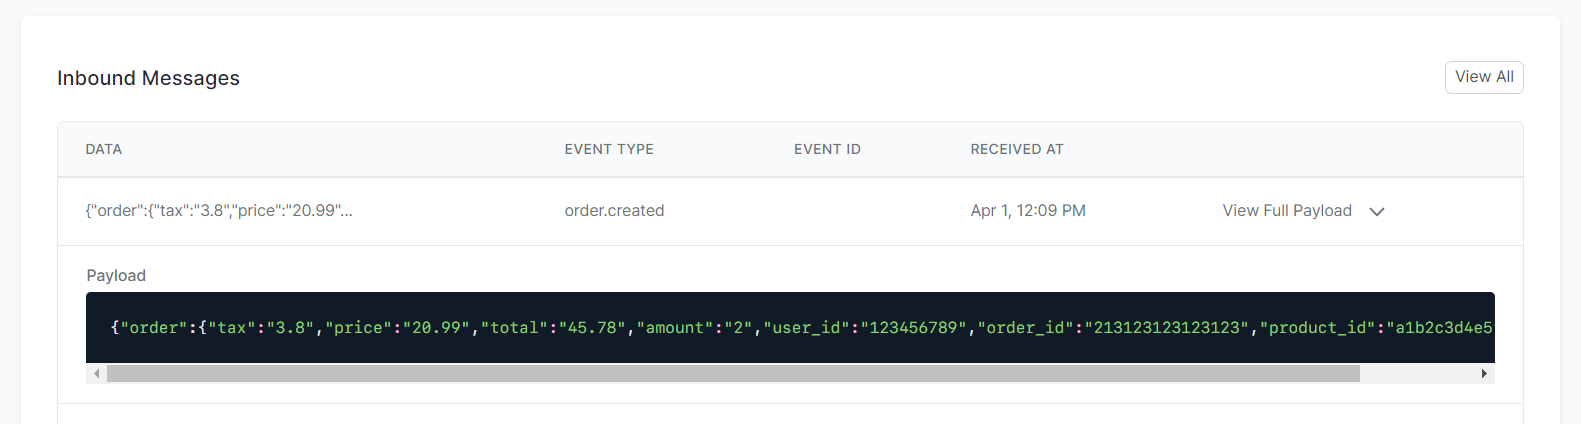
To recap the flow: Frontend (cURL request) -> Orders Demo App -> HostedHooks -> Subscriber endpoint (the gif below).

This is showing us creating an order on our backend (via cURL) , then sending that event over to the HostedHooks API, routing to the subscriber that we created and ultimately passing on the webhook message to the subscribers endpoint (simulated by our HookHelper).
Recap
To recap, we've just walked through how simple and straightforward it is to connect a NodeJS application with HostedHooks to send out webhooks. We hope this was helpful and if you have any questions, please reach out!
Follow Us
You can follow us @hostedhooks or sign up below to receive our updates.
Try HostedHooks Free
Getting started is easy! No credit card required.


